In this post we discuss the Procgen Benchmark, a suite of 16 game-like environments that are procedurally generated; see also the related OpenAI blog entry. This means the game is a bit different every time it starts, and so it is more difficult to master it as the agent needs to learn the meaning of the different images and movements rather than just their location and timing they appear on screen (which in itself isn’t so easy already). The goal of the authors of Procgen is to reduce the overfitting that may appear also in large training datasets. The project has 16 games and here we explore them with an agent that performs random actions. In the next post we will try to solve one of the environments, but for now we only want to understand the motivations, get familiar with the project and generate nice pictures.
from collections import deque
from itertools import count
import gym
import matplotlib.pylab as plt
import numpy as np
import procgen
The environment intrinsic diversity demands that agents learn robust policies; overfitting to narrow regions in state space will not suffice. As the name suggests, the project uses procedural content generation, that is the content is generated by an algorithm with some random components. This means that every time the environment is reset it is slightly different from the previous one, with potentially unlimited variations. Depending on the games, the diversity can make the learning easy, moderate or difficult.
Although some pseudorandom decisions may be taken in the game by the enemy, the transition function is deterministic. The action space is composed by 15 actions, the state space is an RGB image of size 64x64.
print(f"Procgen has {len(procgen.env.ENV_NAMES)} environments.")
Procgen has 16 environments.
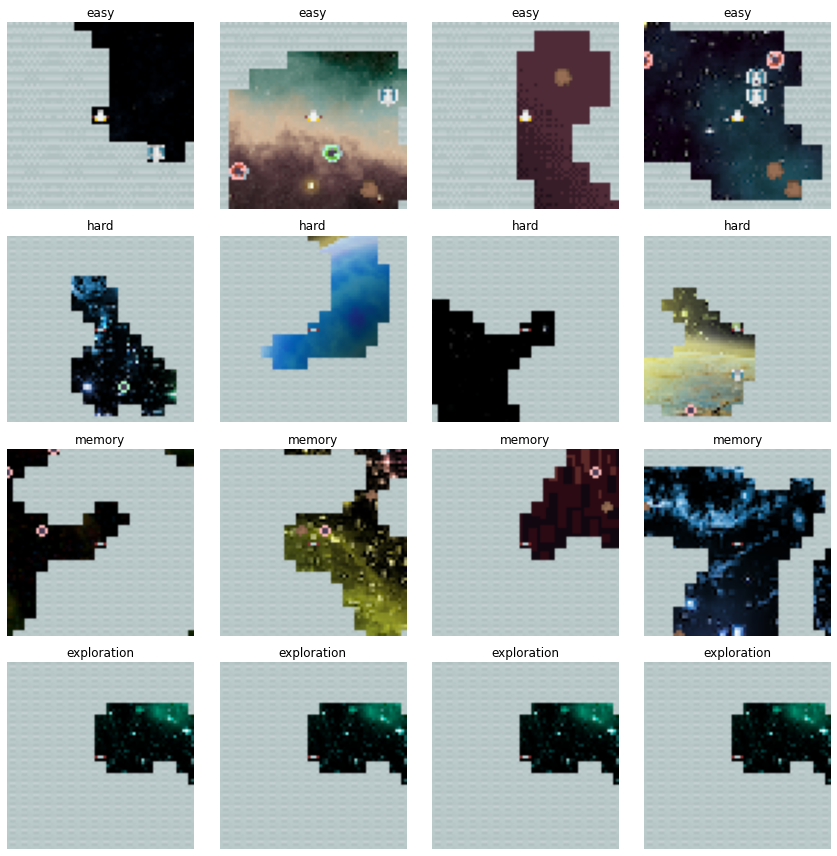
The parameter distribution_mode can be set to easy, hard, memory or exploration. From the source code there is also extreme, but this crashed my kernel.
all_initial_states = {}
modes = ['easy', 'hard', 'memory', 'exploration']
for mode in modes:
    initial_states = []
    for _ in range(4):
        env = gym.make('procgen:procgen-caveflyer-v0', distribution_mode=mode)
        initial_states.append(env.reset())
    all_initial_states[mode] = initial_states
fig, axes = plt.subplots(figsize=(12, 12), nrows=4, ncols=4)
for i, mode in enumerate(modes):
    for initial_state, ax in zip(all_initial_states[mode], axes[i]):
        ax.imshow(initial_state)
        ax.axis('off')
        ax.set_title(mode)
fig.tight_layout()
fig.savefig('procgen-splash.png')

What we want to do is to generate a mini-video with at most 64 frames. We look over all the environments and for each we generate the required number of states, where each state is the frame that is seen on the screen and that can be converted to an image. Since the agent performs randomly, it may done soon, so we start as many episodes as it is needed to generate the required number of states.
MAX_STATES = 64
env_states = {}
for env_name in procgen.env.ENV_NAMES:
    env = gym.make('procgen:procgen-' + env_name + '-v0')
    states = deque(maxlen=MAX_STATES)
    for _ in count():
        states.append(env.reset())
        done = False
        while not done:
            action = env.action_space.sample()
            state, _, done, _ = env.step(action)
            states.append(state)
            if done:
                break
        if len(states) == MAX_STATES:
            break
    env_states[env_name] = states
A small addition is to add the environment name to the image, which is easy to do with the PIL module. In our notation this converts the states into proper images, even if they were images before as well.
from PIL import Image, ImageDraw, ImageFont

font = ImageFont.truetype("font3270.otf", 12)

env_images = {}
for name, states in env_states.items():
    images = []
    for state in states:
        image = Image.fromarray(state)
        draw = ImageDraw.Draw(image)
        draw.text((5, 5), name, font=font, fill=(255, 0, 0, 255))
        images.append(np.array(image))
    images = np.array(images)
    assert images.shape == (MAX_STATES, 64, 64, 3)
    env_images[name] = images
What we do now is to put all the images in the same NumPy array, rearrange the first two axes (because axis 0 is the environment and axis 1 the time evolution, and we want time to come first) and reshape the array to have a four by four grid for the sixteen games. We can then glue together the rows and the cols to have a single big image for all the games.
data = np.array(list(env_images.values()))
data = np.swapaxes(data, 0, 1)
data = data.reshape(MAX_STATES, 4, 4, 64, 64, 3)
video = []
for frame in data:
    video.append(np.vstack([np.hstack(row) for row in frame]))
video = np.array(video)
from matplotlib import pyplot as plt
from matplotlib import animation
fig = plt.figure(figsize=(8, 8))
im = plt.imshow(video[0,:,:,:])
plt.axis('off')
plt.close() # this is required to not display the generated image

def init():
    im.set_data(video[0,:,:,:])

def animate(i):
    im.set_data(video[i,:,:,:])
    return im

anim = animation.FuncAnimation(fig, animate, init_func=init, frames=video.shape[0],
                               interval=100)
anim.save('./procgen-video.mp4')
from IPython.display import Video

Video('./procgen-video.mp4')
We also note that the ProcGen developers have provided an easy way to play the games interactively. They are less appealing than the Atari ones for human players but still interesting. This is not the goal: they are a very good choice to train agents, as they the step() method is really fast and installation is a breeze on any operating systems.